Pat Fiorello - Art Elevates Life

Art & Inspiration from professional artist and instructor Pat Fiorello. Pat is known for her romantic landscape, garden and floral paintings in oil and watercolor. Her paintings often depict beautiful places like Italy and France. Pat teaches painting workshops in the U.S., Caribbean and Europe. She is passionate about inspiring others to include art in their life. Whether creating it or simply appreciating and enjoying it, there are so many ways that art elevates life!

Thursday, May 26, 2011

Viewing Art is Like Being in Love

 
Red Rose Study
Oil Painting by Pat Fiorello
6 x 8


I'd like to share an interesting article on the effects of viewing art. Brain chemistry research has shown it's similar to the feelings of falling in love. No wonder we artists and art lovers are so passionate.
Click here to link to the article:        Viewing Art is Like Being in Love

Tuesday, May 24, 2011

Flower Painting Class

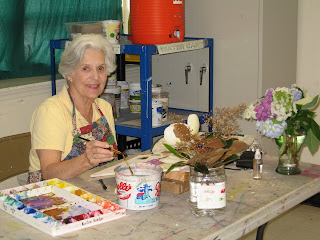
This was the last session of the Painting Flowers- Loose, Fresh & Easy class I teach in Atlanta.
We had a great class of 15 painters. We paint each week from flowers the students bring in. It's fun to have a room filled with artists happily at work surrounded by colorful  flowers. 
Here are some of the students at work.
  Have a great summer and see you again in the fall.

For those who don't want to wait till then, I have added a new one day workshop on June 14th at the 
Smith Gilbert Gardens in Kennesaw GA. It will be a plein air painting workshop designed especially for those who might be new or less experienced at painting outdoors. I shared about the gardens on an earlier blog post (May 6).   If interested, please contact me at patfiorello@aol.com


Saturday, May 21, 2011

Hydrangeas Take 3

Hydrangea Impressions
Oil Painting by Pat Fiorello
9 x 12

Tried a totally different approach on the hydrangeas today using a method I learned from Susan Sarback, founder of the School of Color & Light, capturing more of an impressionist look. It's done totally with a palette knife and is very different from the "transparent start" and more classical approaches I used the past 2 days( see blog posts for the past 2 days). This one does look very different- partially due to the palette knife textural effects and also the intensity of colors achieved.

Thursday, May 19, 2011

Hydrangea Painting-Take 2

Photo of hydrangeas


Today I decided to paint the same hydrangeas as yesterday, but with a totally different approach. Yesterday I approached it using the method I learned from Hedi Moran while at the Scottsdale Artists School earlier this year. That approach starts with transparent colors only then builds with opaques in the 2nd stage. Today I tried a more classical approach . Here are a couple of preliminary stages and then the paintings in it's close to final form (still need to touch up a few areas, but this is as far as I got today).


This is the result of today's approach compare to yesterday's below.


Both approaches were fun and the results were not as different as I had expected. The classical approach feels a bit more formal and tight,  than Hedi's approach which feels a lot freer to me, but knowing that I could make some adjustments next time if I want. I guess the good news is that you can get to the same end with a variety of means. Maybe WHAT you want to paint is more important than HOW you get there. A lesson for painting- and a lesson I have come across in other areas of life. Sometimes we let the "how" get in the way ( or even stop us... in the case of "I don't know how") . If you know what you want and why it's important, many hows can get you there.

What do you think? Have you had that experience in art or other places in life?

Wednesday, May 18, 2011

Hydrangea Painting

Hydrangeas in Blue
Oil Painting by Pat Fiorello
12 x 16


Here's today's painting. The hydrangeas are out in bloom and beautiful. They are one of my favorite flowers to paint.


 Here is the still life set up which I simplified a bit:


The start- using only transparent oil paints


Adding in a background underpainting, still only transparent paint.


 After the 2nd stage, where I added opaques and adjusted colors, values edges, brushwork. On the easel left, with the set up  on the right.

It was a fun day!
 I plan to try the same arrangement in a very different approach later this week and will share what I learn.

Sunday, May 15, 2011

You make a difference

Villa Ciprese
                                                         Oil Painting by Pat Fiorello

 I went to see the movie "I Am " today. if you haven't heard about it, it's worth checking out. It was created by Hollywood filmmaker Tom Shadyack, who suffered a significant injury that caused him to really step back and look at his life and the "big picture".  I won't give too much away, but the film is quite thought provoking and  inspiring . It explores how we are all connected  and every individual person can make a difference in the world.

 It had me reflecting on the ways to share positive energy in the world thru my everyday activities in art- creating things that touch people or bring beauty to their environments, helping students and other artists  to grow thru sharing, teaching etc.. . Keeping the bigger picture in mind can reframe the context of creating from a personal activity to a contribution. Sometimes it's easy for that to get lost.

And it reminded me to be grateful for the contributions of other artists that I have received. If not for the generosity of artists who have come before us, we would not have the benefit of much of the knowledge about art that we have today. We in turn have a responsibility to pass that on to others.
 Something to think about...

Friday, May 13, 2011

Creatures of Habit


“First we make our habits, then our habits make us”
John Dryden 17th century English poet

Many of the results that we produce in life are a function of the habits we have - the repeated patterns of behavior that we do almost without thinking. We might have habits that support what we are committed to( like going to the gym  every Tuesday and Thursday or taking a daily walk) or habits undermine what we say we are committed to ( e.g. eating that second bowl of ice cream while watching tv- in that moment maybe our commitment to indulgence and feeling good trumps our commitment to health).

Many times we are unconcious to our habits- they are just automatic. But if you start noticing them, that is the first step to change.

 I noticed a couple this week as it relates to art. First, I seem to get a lot of oil paint all over me and my brush handles while painting.  One day, I noticed the paper towel I lay the brushes down on was covered in paint and the light bulb went off- aha- no wonder these handles get full of paint.  I had no awareness that I habitually laid out the paper towel that way which caused the entire length of the brush and handle to be resting on a towel  full of paint. I was so busy concentrating on  the painting and palette, that I never even noticed that small thing that was causing an annoyance. So I reoriented the position of  the towels to just rest the tips or the brushes( not the handles) on the paper towels and problem solved.

 I also noticed I am pressing the full brush, rather thatn the tip ,down on the canvas with quite a bit of pressure which can muddy the paint. That is a helpful habit or stroke I acquired for watercolor, which had been my main medium for years, but it is not so effective for oils. Also, I kept washing brushes in between color changes in the turpentine cup ( another habit from years of waterecolor where it does help to rinse brushes in clean watec between color changes)  and that can contribute to muddy color. So I have the turp holder out- but I now keep the cover on so that I have to actively take it off if I want to use some turp. This has cut down on that habit dramatically. 

By  becoming more alert to what I am actually doing,  I am now more aware and making small changes that are helping.  None of them are earthshattering- but they were minor things that each took away from the expeience or results of my painting sessions. I'm sure there are others, so now I am on the lookout .

What  unconscious habits do you have that might undermine you? Do you consistently put other things before time for art? Organize or use your materials in an incovenient fashion? Get lazy about putting out fresh paint at the end of a  painting session so you compromise by using sub-optimal colors? Are you doing anything that leads to an annoyance that detracts from your painting experience or prevents your art from being the best that it can be?

Become more mindful of your habits, tendencies and automatic behaviors and notice if they are supporting the results you want . If not, how can you alter things?  I've heard it  takes 21 days to form a habit and that you must replace a bad/old habit with a new one behavior ( not simply remove the old one) to be effective, so be patient with yourself.

If you have noticed anything  that you are habitually doing that would be helpful  share with others, please feel free to comment .
Happy Painting!
 
""Bad habits are like a comfortable bed, easy to get into, but hard to get out of"
-- Anonymous

Why are habits so Important?  Here's what Jim Rohm had to say:
"Motivation is what gets you started.  Habit is what keeps you going.” 

Wednesday, May 11, 2011

Painting on location- Getting Started

Rose Garden
Oil Painting by Pat Fiorello
6 x 8
Painted on location at Smith- Gilbert Garden, GA

This past month with the weather improving, I've had great opportunities to paint outdoors at Callaway Gardens,  in Charleston  S.C. and at Smith Gilbert Gardens in GA. And I'm preparing to teach a plein air workshop in Tuscany later this month. So I'm fully in plein air mode.

After a long winter painting indoors, you forget  both the joy and challenges of painting outdoors.  Its great to be inspired by the beauty of nature and new subject matter, be out in fresh air and sunshine and challenge your observational skills painting from life. On the other hand , you have challenges of moving sunlight, simplifying the abundance of info that nature presents you into a cohesive painting , managing your painting supplies and equipment without the convenience of your studio and dealing with the elements, weather, bugs and and passersby ( making helpful and sometimes not so helpful comments).

 Many of my students have never painted outdoors so today I decided to create a new one day introduction to plein air painting workshop to help people get started and make it a bit easier by learning some tips from someone who's already been down the road. Once the location and date are secured, I'll share that in case it's of interest to you or any of your artist friends.

 If you haven't been out yet this season, you might want to plan a painting date with a friend to take advantage of the spring trees and flowers.
 Happy Painting!

Monday, May 9, 2011

Mixing Natural Greens

Color chart for practicing Natural Greens

If you're an artist. like me who loves painting florals and/or landscapes , you have to make peace with the color green. It is often the most challenging color to handle. Many of the paints in tubes like Viridian, Winsor Green, Pthalo green( which is the same as Winsor), Hookers Green are much too cold to accurately depict natural looking greens. So often artists avoid these colors. Of course you could always mix your blues and yellows to get a range of greens, but there are so many nuances of greens in nature, it's a good idea to have every tool at your disposal.

 My tip is to take the tube greens and add a warmer color to them to warm them up.You can add almost anything- yellow, orange, red, burnt siena, alizarin crimson, even violet, to warm up a "too cold" green. The chart shown here is an exercise I do with my students where we mix a range of greens starting with Thalo green to come up with warmer greens on the right( vs the top thalo green which is right out of the tube). You can get everything from a bright spring or tropical green to a deep, rich evergreen tree type of green depending on what you mix into it.

 I recently did a quick demo of this for a watercolor class I was teaching. You can view it at
http://youtu.be/GObTq57wDQI

Go out and enjoy painting some spring greens this week and give it a try!

Friday, May 6, 2011

Plein Air Painting at Smith- Gilbert Gardens


 Thursday and Friday of this week I participated in a plein air painting event at the Smith Gilbert Gardens in Kennesaw , GA. It was my first time there. There were about 40 other artists painting at the same time and at the end of the 2 days we were each asked to frame and submit 2 paintings for a show at the garden. The garden is the best kept secret in Georgia. Apparently it was a private home and garden and has been  recently made into a public garden( for a small admission of $7). There are 16 acres of gardens, about 30 statues and lots and lots of flowers- Amazing roses and irises were available this week.

Today I tried to tackle roses in the garden, keeping my eye on simplifying the scene, capturing just the essence and feel of it rather than worrying about being exact. Rather than approach it as a landscape,  treated it as I would a still life- only with outdoor light. I picked out a couple of roses as my main focus and then  added other flowers from here and there as needed for the composition.

 Here is the unfolding of the painting- start to finish today...


Initial block in of the flowers and a few specific leaves- only transparent paints


Block in of background added in

Opaque paint added, brushstrokes to add form

 Final painting still on the easel


Framed for tonight's show
.

Thursday, May 5, 2011

A beautiful place to paint...

Lake Garda, Italy

If I had to pick the most beautiful place I've ever been, it would be the lake region of Northern Italy.  I've been there 4 times to paint and will be returning later this year.

Despite being in the northern part of Italy, not far from Switzerland,  the climate is quite mild. The lakes create a microclimate where the weather conditions are more like the Mediterranean. They grow lemon trees, palm trees , bougainvillea, lots of lush foliage. Charming towns and  elegant villas on the lake with a backdrop of majestic and even sometimes snowcapped mountains of the Alps take your breath away.  Incredible inspiration for painting. And it's fun to go on a quick boat ride across the lake to visit neighboring towns.

San Tomaso in Gargnano is our home base


These are some photo's I took when I taught a workshop at Lake Garda in 2010. I am arranging another workshop for this fall. If you'd like to explore and paint this lesser known area of Italy, you are welcome to join in the fun. There is a flyer with the details at  http://patfiorello.com/italianlake_fiorello_fall2011r1.pdf  or just get in touch with me. It's open to painters of all levels and mediums.  a painter's dream come true.


View of Lake Garda from San Tomaso

Tuesday, May 3, 2011

Painting on Location- What to bring for watercolor painting


The other day I shared what I bring on location for oil painting, today I'll share suggestions for watercolorists:


·      Watercolor Paper- Paper quality does make a big difference in watercolor. If there is one place not to cut corners it’s on paper.  Some of the cheaper papers just don’t absorb the paint the way the better papers do, so using better paper will give you better results and will be easier to work with. 140lb cold press - Arches brand  is preferable. Avoid the inexpensive spiral pads if at all possible. I find the blocks are easiest for painting on location.  I suggest  taking an Arches  block 12 x 16 or 10 x 14 or 9 x 12 ( smaller size is good ,especially if you are a beginner). If you prefer to use loose sheets and have a board to attach them to, then that is fine too. In addition to the block for your paintings, bring along some scrap watercolor paper for exercises and other quick studies we may do.

·      Palette – any plastic palette suitable for watercolors (w/cover) [John Pike or Robert Wood are great options]. If you’re just starting out- a simple white plate or inexpensive palette is okay- just make sure it is large enough to give you room to mix paints.

·      Paints – Here are some suggested colors (Winsor-Newton, Holbein, Daniel Smith or Sennelier  brands preferable, but other brands fine unless noted).  Artist’s quality paints will get you much better results than student grade- but either will work. Again these are just suggestions there’s nothing you absolutely have to have. Also, if just starting out, it’s fine to buy the smaller size tubes to keep the cost down. At an absolute minimum you’ll need a red, yellow, blue and burnt sienna, and thalo or winsor green but if you can get a broader range of paints, these are very useful colors to have:                                                                  
o   Lemon Yellow
o   New Gamboge or Indian Yellow*
o   Cadmium Orange
o   Raw Sienna or Yellow Ochre* or Quinacridone Gold
o   Burnt Sienna* or Quinacridone  Burnt Orange
o   Burnt Umber* or Sepia             
o   Permanent or Quinacridone Red*
o   Alizarin Crimson*  
o   Permanent Rose
o   Sap Green*
o   Winsor or Thalo Green*(preferable to viridian or hookers green)
o   Winsor or Thalo Blue or Prussian Blue
o   Cerulean Blue( Grumbacher if possible)
o   Ultramarine Blue*
o   Cobalt Blue*
o   Winsor or Dioxizine Violet                    
     *Indicates suggested minimum palette


Miscellaneous Tools

·      plastic container for water

·       #2 Pencil, sharpener, eraser

·      Sketchbook 
·      Brushes – round (size 6, 10 or 12), flat (½”, 1”or 2” for washes), rigger
·      Natural sponge
·      Masking tape ( avoid the blue tape- it can distort color pecreption)
·      Tissues/Paper towels
·      A cut up credit card
·      Anything else you use often in your techniques and can’t be without (we all have our favorite gadgets

General
-Camera  (with extra memory discs, battery charger (remember converter/adapter for European currency and other accessories)
-Bug Spray
-Sunscreen
-Bottle to carry water for painting (although you can pick up a bottled water there and re-use that after you finish drinking it)
-A hat
-A small folding stool that you can pack in your suitcase (If you don’t have one, there are some excellent options available thru Judson’s Plein Air 1-866-POCHADE or http://www.judsonspleinair.com/
 ( I have the Roll A Chair- 3133 and really like it- it has good back support and is really lightweight)
-You can bring a lightweight easel if you have one and like to use it.  For watercolor, I find a small folding stool and a block that you can put on your lap work pretty well.

Despite all this, try to think minimal and not have too much to carry around- it gets heavy (maybe someday I will follow my own advice). Take a bag you can carry all your supplies in.

 In terms of the plane- pack anything that could been viewed as a knife( even palette knives) inside your packed luggage. I pack my paint tubes inside Ziploc bags inside a Tupperware type container in my suitcase and note that they are artists supplies- non-flammable/hazardous in case someone checking my bag isn’t familiar with watercolor paints.  If you have some absolute favorite brushes, you may want to take them in your carry on just in case-I do- I’d hate to have to rebuild my collection of brushes if my luggage got lost.


If I've missed any of your favorite on-location tools or supplies, or if you have any other tips, please send a comment to share with others. Thanks and Happy Painting!


Sunday, May 1, 2011

Painting on Location- What to bring for oil painting


The spring season ushers in a whole host of opportunities to paint outside. Whether as part of an organized group,   a special plein air event, an outdoor workshop or even just  a spontaneous paint out with a friend, this is the perfect time to get back out there if you haven't been hard core enough to venture outside of painting in your studio during the winter.  I have several opportunities coming up soon to paint outdoors, so I'm getting my gear ready and figured you might be too. So I'm sharing my list of what I typically bring when I paint on location to help you organize. I'm painting later this week at a paint out at the Smith Gilbert Gardens in Georgia.
 I plan to paint there in oils so will share my supply list for oil painting on location today and then will address watercolor supplies in a blog post later this week.

Although I advise  my students to pack light, I usually never follow my own advice, because I want all my stuff with me. I'm sure other artists go out with only the bare essentials, but I like to have whatever I might need ( I suffer from the same affliction when packing my clothes too!) Also the list varies depending if I'm flying or driving (with the luxury of taking more stuff "just in case") but here goes:

Pat's Oil Painting Plein Air supply list 

·      Small ( 6x8, 8 x 10 or 9x 12) panels are great on location. You can get inexpensive ones form paneili telati from ASW on line or New Traditions.
·      You can get a wet panel carrier from Raymar or Judsons. I’d go for the corrugate ones, not the heavy wooden box so it’s lighter to transport. You might also bring some wax paper to put between panels.
·      Keep it simple on the paints- you might even want to try a limited palette-  cad red medium, yellow medium, ultramarine blue, white and perhaps viridian or transparent red oxide. I pack the tubes in a zip loc bag inside a plastic Tupperware type container to protect against any leakage and put them in my suitcase. If you go to the paint manufacturer sites, they sometimes have a list for travel noting that these are Artists Colors and have an acceptable flash point for airline travel- I know Gamblin has the sheet . Include that in with your paints so TSA knows what they are. Don’t carry them on pack in your suitcase.
·  A few brushes or palette knives you like to use ( again try to limit the number to make it easy).
·     Mineral spirits or mediums that you typically use ( On drivable trips I bring them, but for flights you need to get the mineral spirits at your destination)
·       small plastic container with a bar of  soap to clean brushes or one of those brush cleaners or a travel size plastic bottle with some Dawn or Murphy’s Oil soap in  it to clean brushes
-Saran Wrap-sometimes if I have a lot of paint left on my palette I'll save it for the next day
-Paper towels ( with bungee cord to hang on your easel) and plastic garbage bag 
-Easel/palette and tripod( or whatever easel  set up you have). I use openbox M
-pencil, sketchbook, vine charcoal if you use it
-viewfinder , value chart or other compositional aids
-for a paint out which involves a show of the work, you might need to bring frames, screwdriver, wire for hanging ( and make sure the frame size matches the panels you're bringing)
-masking tape- comes in handy sometimes for the unexpected 


General

-Camera  (with extra memory discs, battery ) 
-cell phone for emergencies
-Bug Spray
-Sunscreen
-baby wipes for cleaning hands
-Bottled water, snacks
-A hat
-business cards( you never know who you might meet while painting)


If I've missed any of your favorite on-location tools or supplies, or if you have any other tips, please send a comment to share with others. Thanks and Happy Painting!