 |
| Sisters! 6 x 8 Oil Painting by Pat Fiorello $100 |
Pat Fiorello - Art Elevates Life
Friday, March 30, 2018
Sisters!
Thursday, March 29, 2018
Hydrangea Cottage in Watercolor
 |
| Hydrangea Cottage 12 x 16 Watercolor by Pat Fiorello 7 day auction starting 3/28/18 |
On Wednesdays, I often will offer up a special auction of one of my early watercolors at a great opening bid on ebay. So keep posted from time to time by searching ebay "Pat Fiorello Original Art" and you may just get lucky and find a hidden gem at an exceptional value.
Wednesday, March 28, 2018
Rose Trio
 |
| Rose Trio 8 x 10 Oil Painting by Pat Fiorello $300 A past watercolor student of mine is transitioning to oil and asked to have a private painting lesson. She wanted to see how I worked in my studio, what materials I used, and how I approached the painting process. So we set up a 2 hour session where she came to my studio and watched me at work and asked questions along the way. |
I lay in masses for where the flowers will generally go. No specific line drawings, just the overall shape in the darkest value I see using transparent colors only. Then I add in the background. Once the whole canvas( or in this case gessoboard) is covered, then I begin adding the lighter shapes on top with more opaque paints, working back and forth, re-establishing dark accents if I lose them. At some point ( the last photo) I scraped off the whole background as I felt it was getting to be too much of the same everywhere. Ultimately, I wanted the flowers which are the main attraction to be more defined and the background to be more abstract and softer edged. The end result, Rose Trio is pictured above.


Thursday, March 22, 2018
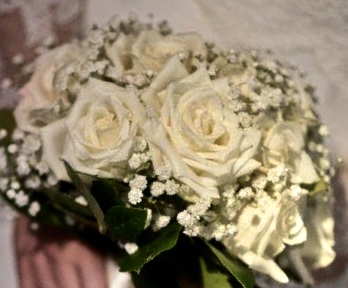
Amanda's Day
 |
| Amanda's Day! 16 x 16 oil painting by Pat Fiorello SOLD |
I'll typically get several photo's after the wedding, crop them to find the best design for a painting composition, make a recommendation to the client and then create the painting from there. Since I work from photo's, there's no need to save the actual bouquet and distance is not an issue. I can ship the completed painting wherever it needs to go.
If you would like to have me create a "Forever Bouquet Painting" as a special wedding or anniversary gift for a loved one in your life, please contact me here.
You can see many more examples of bouquet paintings I've done for brides across the country and even internationally at bridalbouquetpaintings.com.


 |
| Starting to crop in on the viewpoint for the painting. |
Thursday, March 15, 2018
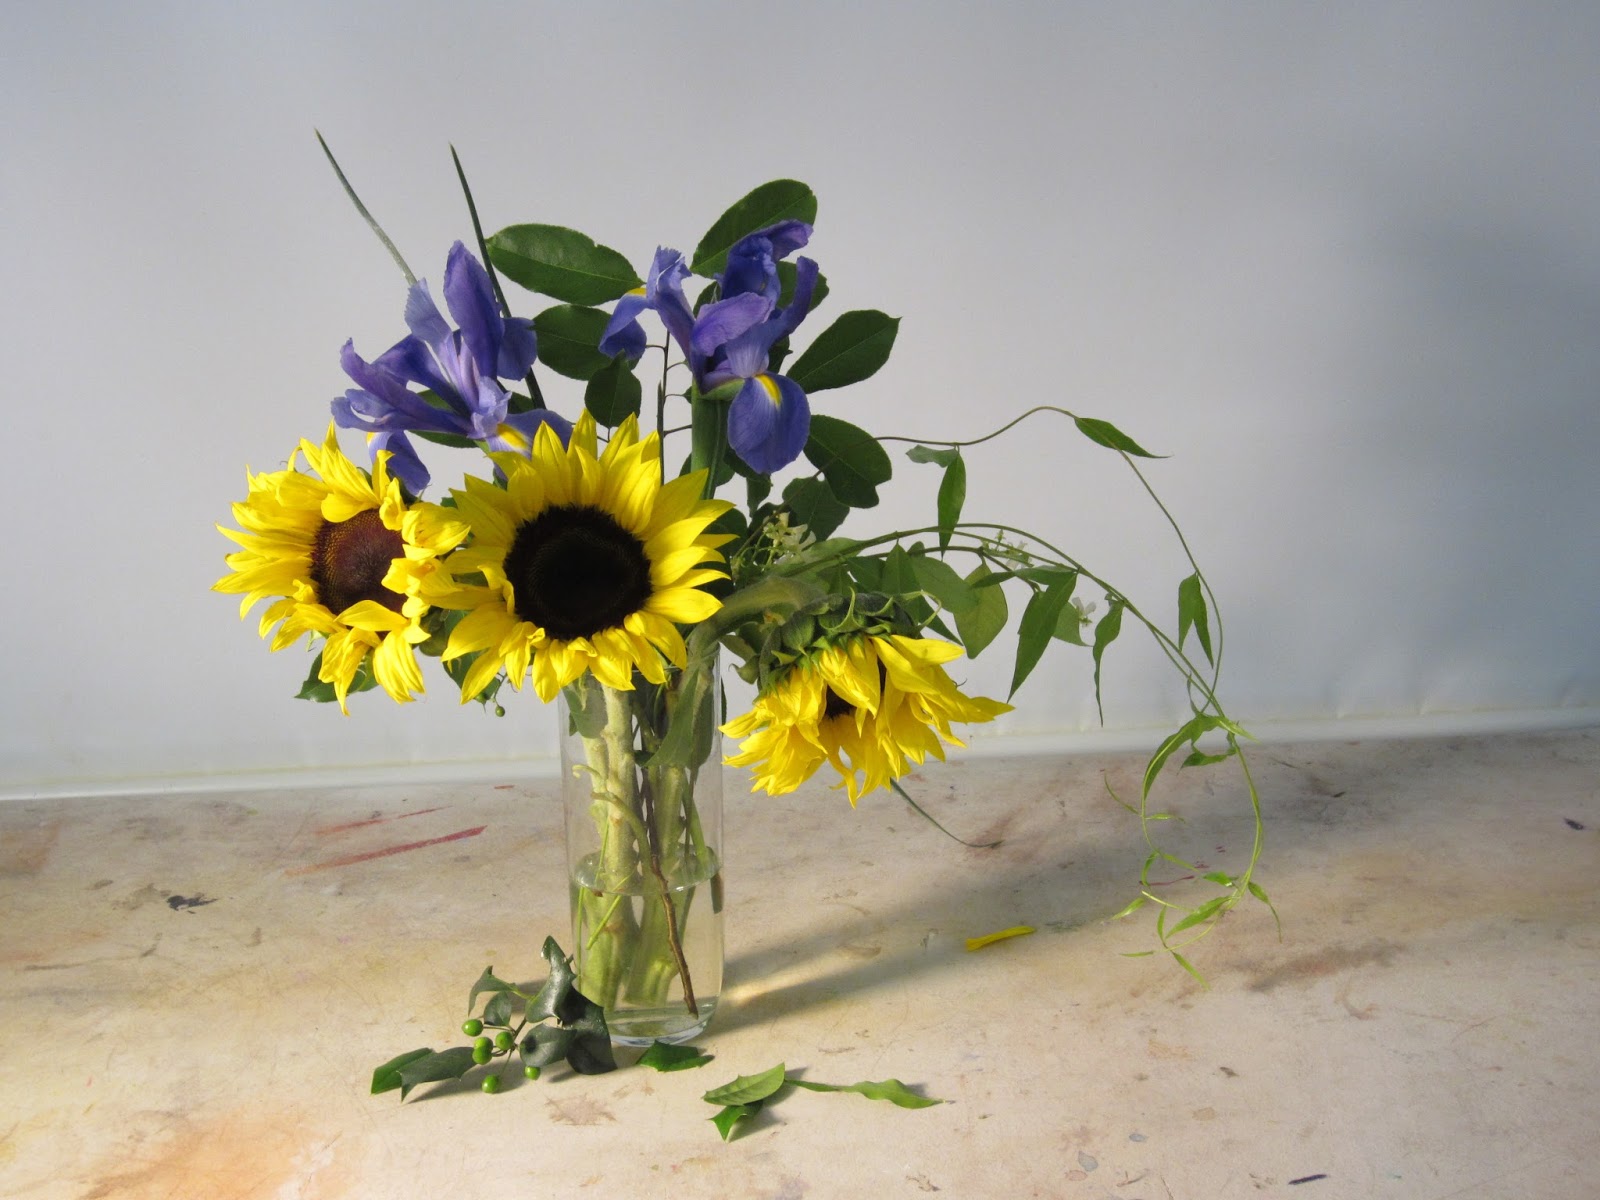
Sunflowers and Irises
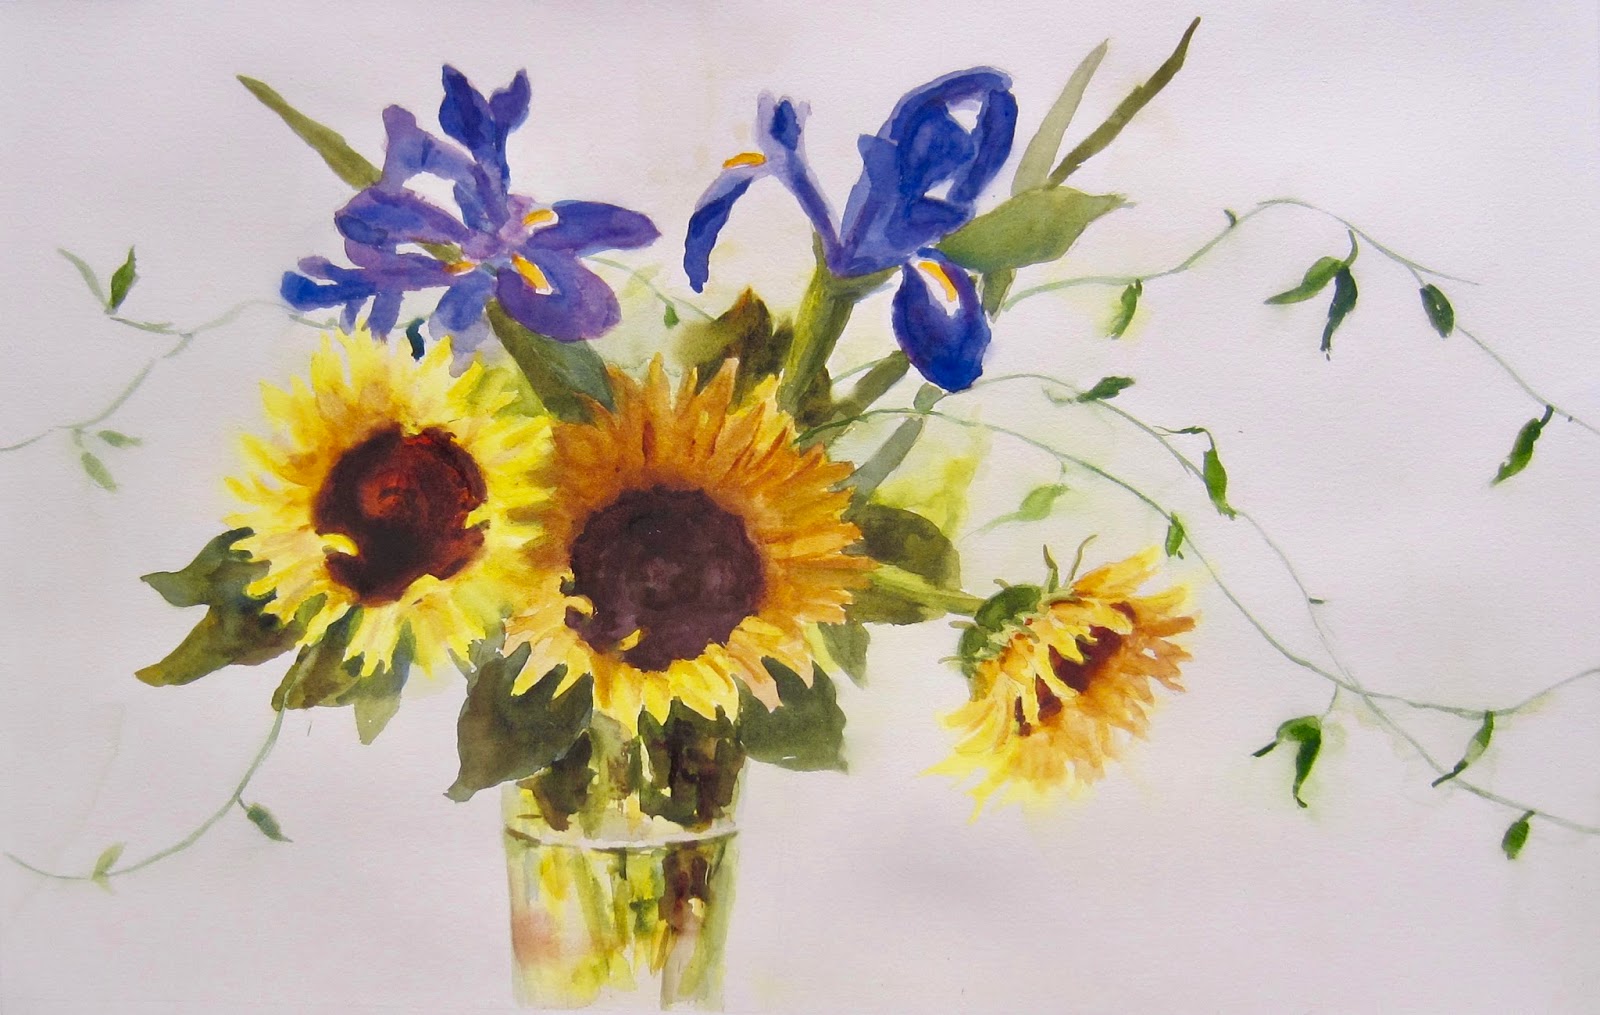 |
| Sunflowers and Irises 26 x 16 Watercolor Painting by Pat Fiorello SOLD
I recently created this painting which was commissioned by a client who has several of my oil paintings. She was redecorating an area of her home and had seen a painting of mine which had sunflowers and irises but was already sold. She asked if I could create something similar in watercolor for a space that would need a 26 x 16 painting allowing for an additional few inches for matting and framing to fit in the space perfectly.
 I went back to some earlier photo's I had of a bouquet I had arranged of sunflowers and irises and then in photoshop created several different compositional ideas for my client to consider. I went back to some earlier photo's I had of a bouquet I had arranged of sunflowers and irises and then in photoshop created several different compositional ideas for my client to consider.
First I had to adjust the size of the original photo to be proportional to the ultimate size of the painting (see light grey area added on original photo on right) .
Some options were tabletop including the full vase and shadows, somewhere closer in, on some I "whited out" some of the unnecessary foliage in the background so the the shape of the iris would be clearer. With the paintbrush tool I added in more of the lacy foliage that my client said she liked.
I find photoshop a helpful tool to share concepts with clients to give them a ROUGH visual idea of where you are headed. It is one thing to use words to explain what you are envisioning, but often people have a hard time imagining what something might look like. Or maybe their idea of a dark background and your idea of a dark background might be very different- so visually showing them is helpful to make sure you're on the same page and there are no surprises when you deliver the finished work. This is especially important with watercolor where it is not very easy to make major compositional changes once a painting is done. Also, in the photoshop design phase upfront, you can pretty quickly and easily make design changes or give options based on feedback. This way you and your client have a clear understanding of where you are headed and you increase the odds that you will have a satisfied customer.
|


Tuesday, March 13, 2018
Hydrangeas for a Sunday Afternoon- Step by Step Tutorial on How to Paint Flowers
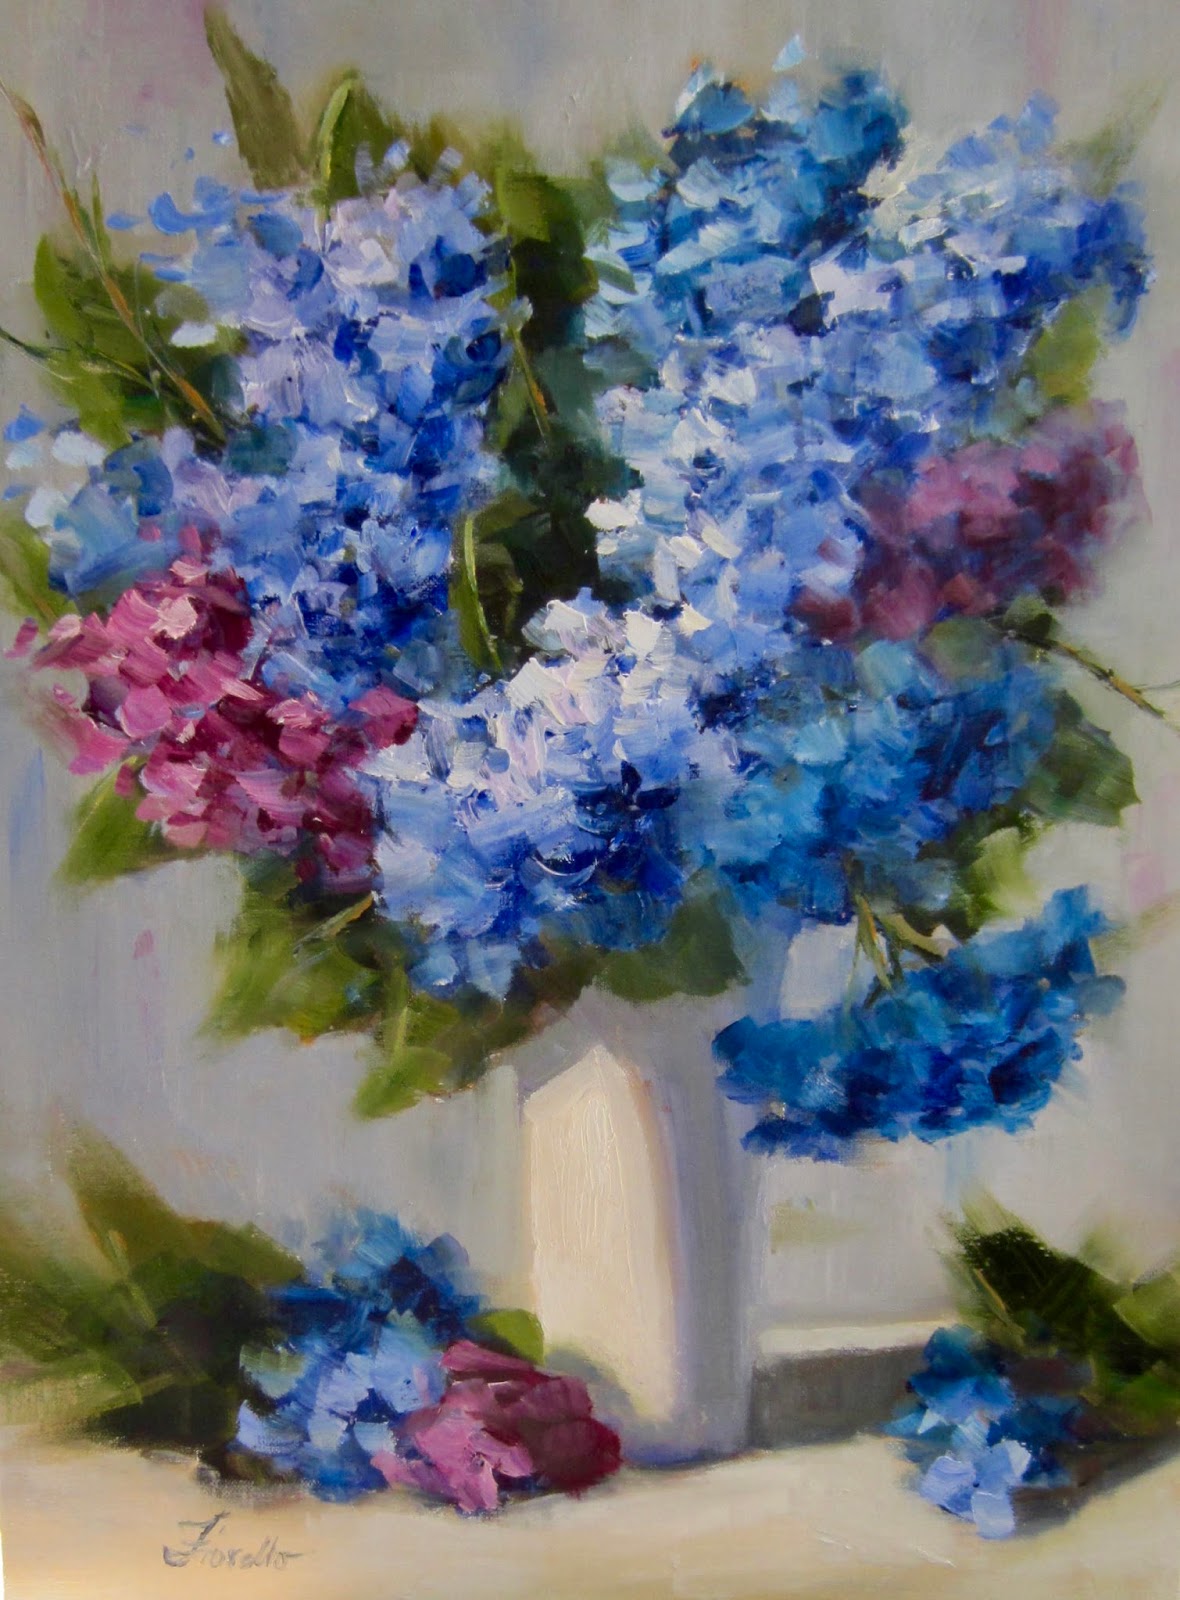 |
| Hydrangeas for a Sunday Afternoon 12 x 16 Oil Painting By Pat Fiorello $650 |
She has done a bit of oil painting already wiht some excellent instructors but wanted to learn how to paint flowers. We spent the day painting a still life of these hydrangeas together. I use several different approaches for oil painting, but the transparent underpainting approach that I first learned from Hedi Moran is one of my favorites because it is fun and freeing. I feel like I am almost sculpting with paint since the process is so malleable.
Here are the steps.
In stage 1 you only use transparent paints- no white, no cadmiums, just tranparents. You can use some medium to thin them a bit. You do not want really thick paint at this point. Just laying in a base to paint on top of.
First mass in the flower shapes generally in the darkest color that you see ( not worried about light and shadow yet, just going for shape and placement). For my blues I used ultaramarine and thalo which are transparent- did not use cerulean or cobalt yet since they are not transparent. But we may use them in Stage II.

Mass in leaf shapes with darkest color you see in your set up.

Next add in underpainting for vase. I'm working here with warm light and cool shadow so I used indian yellow for the lit side and a purplish blue( ultramarine and permanent rose) for the shadow side. Look and see if you like the overall shape of your bouquet and vase. At anytime you can wipe off and reshape. You can also cut in to the shape with the background later on too.

Now we have to put in an underpainting for the background. I chose an orange for this particular painting because ultimately I will want a neutral grey and blue and orange make grey. Also this painting will be predominantly blue so if a few bits of orange peek thru in the background that may be a nice touch of complementary color for contrast. But there are lots of ways to go here.
At this point you have to calm yourself down because the painting is sooooo intense and garrish- but don't worry this is just Stage one- the underpainting- setting the stage for what will come on top of it. Breathe. Everything is going to be all right- and if not, we can always scrape it all down. I had the opportunity to study with Ovanes Berberian, an amazing Russian Impressionist painter. As I'm painting, I can still hear him saying in his thick Russian accent "You scrape, You learn!"
So the canvas is totally covered wiht the underpainting. if you are satisfied with the composition move on, if not wipe out and revise.

Okay, now we are switching gears. Moving on to Stage II. Now you can use all your paints, so take out the white and the cadmiums, yellow ochre. Anything goes.
Now we begin to build form on each of the shapes. We already have the darks laid in, just need to add midtones and lights. Try not to cover up all those darks, let some show thru. I'm trying to follow the pattern of light falling on the hydrangeas.

Continue painting each area, the flowers, the leaves, the background, vase, tabletop, shadows. Refine as you see fit. Sign the painting and you're done.
Hope you had fun!


Here are a couple of close-ups of some brushwork.
Hydrangeas are so much fun to paint!


Saturday, March 3, 2018
Camellia Celebration
 |
| Camellia Celebration 8 x 10 Oil Painting by Pat Fiorello $300 |
Last year we planted some new camellia bushes and this year we are reaping the rewards. They have been blossoming like crazy the past couple of weeks here in Atlanta. I took a photo of one grouping on the bush the other day and decided to use it as inspiration for a painting. I let go of the need to paint the fence as it was and just simplified the scene to a light background.
Here's how I got started just blocking in the general shapes and placement with transparent dark colors. In the beginning, I aim for darker than I will ultimately end up with so that as I add lighter and lighter shapes they have contrast to sit upon. I use what might be helpful from the photo reference or set up if I have fresh flowers in front of me. but don't feel compelled to use it all- just what will work for my composition.

Then next I begin adding more color and start getting more specific with shapes starting from my darkest value shapes and moving lighter as I progress. I don't necessarily have only one approach, but this is one way I often proceed.
If you'd like to learn how to paint flowers in this easy, fun and freeing approach, join me for an upcoming workshop or a private lesson.
My next workshop is at the Booth Museum Art Academy, in Cartersville, GA May 4, 5 & 6.
Click here for details or to register

Here's the original photo form my garden.

Subscribe to:
Posts (Atom)